En:Customer-Card: Unterschied zwischen den Versionen
Zur Navigation springen
Zur Suche springen
Keine Bearbeitungszusammenfassung |
Keine Bearbeitungszusammenfassung |
||
| Zeile 22: | Zeile 22: | ||
# Parcel Labels: Overview of generated parcel labels and the option to create new parcel labels. | # Parcel Labels: Overview of generated parcel labels and the option to create new parcel labels. | ||
# Customer Contacts: Overview of documented customer interactions via phone, email, etc. | # Customer Contacts: Overview of documented customer interactions via phone, email, etc. | ||
| Zeile 27: | Zeile 28: | ||
<br> | <br> | ||
==Icon Bar== | ==Icon Bar== | ||
Version vom 2. Oktober 2024, 12:06 Uhr
| So findst Du diese Seite: |
| Symbol: |
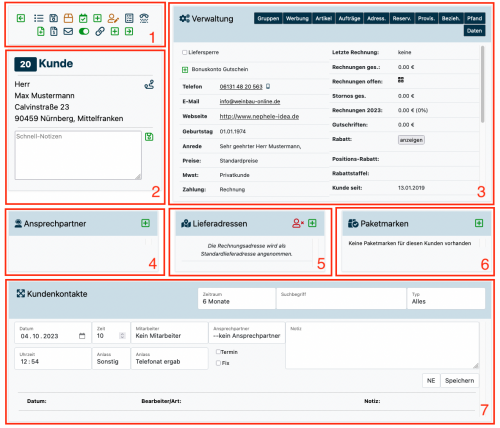
You can access your customers information card using the customer information icon . This icon is displayed on the right side of each customer in the en:Customer List. In the customer information card, you can view and edit all relevant information about your customer, including address data, customer orders, purchased items, reservations, contacts, and more. The customer information card is also automatically displayed after creating new customers or after an en: New Customer . You can learn more about how the customer record looks and what information it contains on this page.
Structure of the Customer Information Card
- Icon Bar: Quick execution of various actions.
- Customer: Customer information and important notes.
- Management: Additional customer information and the ability to view orders, purchased items, and customer groups.
- Contact Persons: Overview of registered contacts, including phone numbers and email addresses.
- Delivery Addresses: Overview of stored delivery addresses.
- Parcel Labels: Overview of generated parcel labels and the option to create new parcel labels.
- Customer Contacts: Overview of documented customer interactions via phone, email, etc.
Icon Bar
The icons in the icon bar allow you to quickly perform various actions. Here’s what each icon does:
- Go to the previous customer card (active customer card with the next lower customer number).
- Navigate back to the parent customer list.
- Upload files to a customer file.
- Create a package label for this customer.
- Schedule a new appointment for this customer.
- Create a new task for this customer.
- Edit the customer file and update customer data.
- Select invoices for this customer.
- Start an online search for phone numbers related to the customer's name.
- Create a new order for the customer.
- Jump to the last order of the customer.
- View all invoices for this customer.
- Send an email to this customer.
- / Mark the customer as inactive or reactivate an inactive customer.
- Link this customer file and notes with another customer file: It often happens that a customer appears multiple times in the database. Before marking a customer as inactive, the conversation notes of that customer should be linked with the new or "main customer" to avoid losing old information.
- Add a new customer.
- Go to the next customer card (active customer card with the next higher customer number).
