En:Payment control: Unterschied zwischen den Versionen
Shari (Diskussion | Beiträge) (Die Seite wurde neu angelegt: „{| style="background-color: #043149; color:#fff; padding:10px; float:right; margin-left:10px; margin-top:10px; position:relative; border:1px dotted #666; text-align:center;" | |'''How to find this page:''' |- |Image:Auftrag_icon.png |- |Orders |- |current/unpaid/paid |} You can open the manual incoming payment control of Winestro.Cloud by clicking on the $ sign at the top right of the overview for the respective order. You will also find the same b…“) |
Shari (Diskussion | Beiträge) |
||
| (Eine dazwischenliegende Version desselben Benutzers wird nicht angezeigt) | |||
| Zeile 2: | Zeile 2: | ||
|'''How to find this page:''' | |'''How to find this page:''' | ||
|- | |- | ||
|[[Image: | |[[Image:Order icon.JPG]] | ||
|- | |- | ||
|Orders | |Orders | ||
| Zeile 15: | Zeile 15: | ||
If you click on the dollar symbol, the following window will open: | If you click on the dollar symbol, the following window will open: | ||
[[Datei: | [[Datei:Payment control.JPG|700px]] | ||
You can now enter a payment amount, the payment method and the date and then click on "ok" to add the payment. | You can now enter a payment amount, the payment method and the date and then click on "ok" to add the payment. | ||
Aktuelle Version vom 4. Oktober 2024, 15:10 Uhr
| How to find this page: |
| Orders |
| current/unpaid/paid |
You can open the manual incoming payment control of Winestro.Cloud by clicking on the $ sign at the top right of the overview for the respective order. You will also find the same button in the Edit order view. The $ symbol appears red , if the order has not yet been paid, otherwise it is displayed in green.
Structure of the incoming payment check
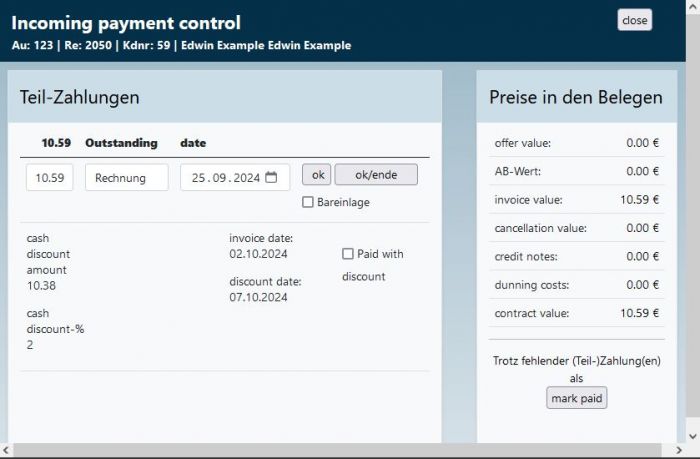
If you click on the dollar symbol, the following window will open:
You can now enter a payment amount, the payment method and the date and then click on "ok" to add the payment. If you have entered sufficient payments for an order, it is automatically marked as paid. You can of course also delete any incoming payment by clicking on the rubbish bin symbol.
, at the respective entry. The order is then automatically marked as unpaid again if necessary. You can mark an order as paid despite a shortfall.
Automatic/batch-based incoming payment control
From the complete package onwards, we also offer the practical import of incoming payments from various formats in the financial accounting interface. Simply load your bank account transactions as a CSV file in the programme (under Financial accounting - Payment import) and Winestro.Cloud automatically assigns the payments to the corresponding orders. You can then use the booking list to assign payments that cannot be assigned automatically automatically - e.g. because someone has entered a transposed number in the invoice number. It is also possible in the financial accounting interface under the "Status" tab to mark orders (e.g. with/without invoice or with instalments) as paid within any period of time. You can find out more about this under FIBU interface.
Frequently asked questions and problems
How can I display sales lists sorted by payment type?
Visit the corresponding area in the Winestro.cloud statistics. You can find out more under Turnover.
My incoming payments are not shown in the statistics
You have probably entered the incoming payments, but created values such as February 2016 as the date (see order no. 3). This may be because you have set the following in the settings (System / Settings / Orders under ‘Date of payment received’): "Suggest the date of the last entry (for daily entry)". If necessary, adjust the value here and correct the incoming payments.
===How can I mark payments as unpaid again? Simply delete the incoming payment or alternatively create a negative incoming payment. The shift to the status "Unpaid" now takes place automatically.
How do I book a collective transfer for e.g. 3 invoices?
Unfortunately, the collective transfer is only entered as one item in the incoming payment control. If you need to enter such an item, open the individual orders for which the transfer applies and enter the incoming payment there manually. Now mark the item in the incoming payment control as to be deleted.
