En:New article: Unterschied zwischen den Versionen
| (12 dazwischenliegende Versionen desselben Benutzers werden nicht angezeigt) | |||
| Zeile 12: | Zeile 12: | ||
There are a total of 13 information areas for each article. The information to be entered is used to record your articles in the program, which you can edit again at any time. | There are a total of 13 information areas for each article. The information to be entered is used to record your articles in the program, which you can edit again at any time. | ||
===Basic data=== | |||
[[Datei:engBasisdaten.PNG|300px]] <br> | |||
'''article number''': A new article number is automatically suggested by the program, but you can also enter your own number. An article number can only be used once. New fillings must also be created as separate and new articles, as they receive their own AP number and you can therefore prove what happens to these bottles. Your customer, on the other hand, is less interested in which filling of the wine they have received. On the contrary, this can even lead to confusion, questions and therefore more work. This is why we have integrated the option that 2 articles can look exactly the same to the customer, but can be perfectly separated internally for you. This task is performed by a "+". | |||
Example: ‘’Item no. 14‘’ is filled twice. Filling 1 would therefore be ‘’article no. 14+1‘’, filling 2 would be ‘’no. 14+2‘’. Internally, everything is now deducted clearly from the correct wine / warehouse, but externally the customer only ever sees ‘’article no. 14‘’ on receipts. | |||
You can also use this system for a constant assignment of article numbers in order to better differentiate between vintages (e.g. 10+2020 | 10+2021). In the statistics, the different fillings are still treated as individual articles and can be analysed individually. | |||
Enter the basic data for your wine here: vintage, state, kind, quality level and flavour. | |||
[[Datei:engArtikel.PNG|800px]] | |||
===classification=== | ===classification=== | ||
| Zeile 90: | Zeile 99: | ||
'''EAN''': Here you can store the EAN codes (pcs/pcs) for the use of a barcode scanner and for labelling on receipts ([[auto fields]]). | '''EAN''': Here you can store the EAN codes (pcs/pcs) for the use of a barcode scanner and for labelling on receipts ([[auto fields]]). | ||
===analytical values=== | |||
[[Datei:engAnalysewerte.PNG|400px]] <br> | |||
Enter all laboratory values for your wine here. The data maintained here serves as the basis for your linked webshop, as well as for the [[e-label]], which you can also create from Winestro.Cloud to display the nutritional value table. | |||
===Document description and texts for platform and online shops=== | |||
[[Datei:Artikelanlage 3.png|700px]] <br> | |||
The article description is used in orders and on the generated documents. Winestro.Cloud first automatically generates a suggested description based on the information entered. For example, the values 2010 | Riesling | dry .... are used to create the document line ‘2010 Riesling dry’. This can save time when creating a new vintage. However, you can easily change the description here as you wish. In any case, please fill in the item name field and you can optionally add the item description. This field is particularly useful in assortments to store the items contained in the assortment once so that they can also be viewed on the vouchers. If you use Winestro.Cloud's multilingual capability, you can change the language in the tabs above the fields. The item is then listed in the required language on documents. | |||
In this area you can enter a text for your [[Private Shop|Private Shop]] and for [[Winestro|Winestro.Shop]], which will be displayed as information for this wine. | |||
===Ingredients list & QR label and expansion & consumption=== | |||
[[Datei:engZutatenliste.PNG|400px]] [[Datei:engAusbau.PNG|400px]]<br> | |||
In addition to the nutritional information, you can also enter the list of ingredients, other information and, for example, the best-before date for juices. | |||
Enter interesting data on the colour, drinking temperature, storage temperature, development, shelf life, drinking maturity and ground (origin of the vine) of your wine here. Among other things, this will affect the information in your linked webshop. | |||
You also have the option of linking your own YouTube video here (insert link), which will be stored there when you use [[Winestro|Winestro.Shop]]. | |||
===product groups und fibu accounts=== | |||
[[Datei:engArtikel anlegen 5.png|700px]] <br> | |||
Here you can assign the item to one or more product groups. You can find out how to create a new product group and what it does [[Product groups|here]]. | |||
Here you can store individual revenue accounts for individual items if these differ from your standard revenue accounts. All comprehensive information about the FIBU interface can be found directly [[FIBU interface|here]]. | |||
===Saving a new article === | |||
To create and save the article, click on the ‘’‘Save’‘’ button at the bottom. You will then be automatically redirected to the [[item index card]] of the newly created item. Prices, shades, awards and much more can be entered there. | |||
===Create other articles (wine tastings, tours)=== | |||
If you would like to create articles from other categories (such as wine tastings or tours) in addition to your wines, the procedure is identical. In the item tab, you define a name, a description and a price as usual. Simply leave out any information that you do not have for this type of item. For the sake of clarity, you can also assign these items to a separate item group and/or make a corresponding note (an abbreviation) in the item number. Be sure to pay attention to the various setting options in the article index, such as the ‘Include number of bottles’ option, which varies depending on the article type. | |||
==copy function== | |||
[[Datei:Kopieroptionen.png|1000px]] | |||
To copy an article, go to the index card of the article you want to copy. There you will find the icon ‘’‘’Use this article as a template for a new article‘’‘’ in the button bar to copy the article. As soon as you click on this button, you will be taken to the screen for creating an article - but this is already filled with all the values from the previous article. You can now change the details as you wish. You can also select further options when copying (see image). | |||
== Frequently asked questions and problems == | |||
=== Can I convert an article into an article assortment at a later date? === | |||
You can convert an existing item into an assortment even after it has been saved. However, you should be careful not to convert existing and perhaps even already sold articles into another/new article, as otherwise you will have different products under one article number and this can lead to errors and misunderstandings in your statistics and possibly also in your financial accounting. Therefore, create a new item file with a new item number for each new item. Items that you no longer use can simply be marked as ‘’‘out of stock’‘’. | |||
'''Selbstverständlich musst Du "normale" Artikel, welche Du einem Sortiment hinzufügen, möchtest nicht erneut anlegen, um sie dem Sortiment anzufügen.''' | |||
=== Number of bottles is not included in loading lists === | |||
This happens if you create a normal article as an assortment by mistake. At first glance, this is not noticeable. The assortment has a normal stock and can be sold as normal. | |||
On loading lists (and when specifying the number of bottles), however, the bottles contained in the assortment are always counted - in this case 0 bottles and 0 kg. Accordingly, the loading lists no longer fit. | |||
Solution: Edit the corresponding article and remove the tick next to ‘’‘’This article is an assortment‘’‘’ | |||
Existing orders and invoices do not change. The problem therefore remains for these - however, everything is now correct for new orders and invoices. | |||
=== Deleting assortments === | |||
Like ‘normal’ articles, assortments cannot be deleted after they have already been used on an invoice. Here too, simply mark the assortment as out of stock. | |||
=== Adding items to the assortment at a later date === | |||
To do this, open the [[item index card]] of the item you have created as an assortment (icon with the magnifying glass symbol). Then scroll down a little to the ‘Items in this assortment’ area. There you can add further items to the range and edit existing items by clicking on the pencil icon. Always make sure that you adjust the ‘Quantity’ and ‘Sales %’ fields accordingly. | |||
Aktuelle Version vom 17. Oktober 2024, 10:48 Uhr
| New article |
Your articles are one of the centrepieces of your ERP system. If you have all entries well maintained here, you will save yourself a lot of time in your day-to-day business. This article shows you how to create a new item and enter the most important information. To create a new wine in the program, either go to ‘’‘Article - article list’‘’ and click on the - symbol. Otherwise, you can also access the screen in which new articles can be created via the menu item ‘’‘Article - New article’‘’.
Input mask for new articles
There are a total of 13 information areas for each article. The information to be entered is used to record your articles in the program, which you can edit again at any time.
Basic data
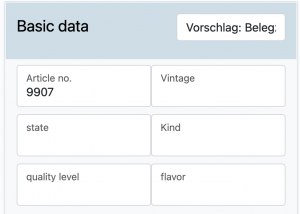
article number: A new article number is automatically suggested by the program, but you can also enter your own number. An article number can only be used once. New fillings must also be created as separate and new articles, as they receive their own AP number and you can therefore prove what happens to these bottles. Your customer, on the other hand, is less interested in which filling of the wine they have received. On the contrary, this can even lead to confusion, questions and therefore more work. This is why we have integrated the option that 2 articles can look exactly the same to the customer, but can be perfectly separated internally for you. This task is performed by a "+".
Example: ‘’Item no. 14‘’ is filled twice. Filling 1 would therefore be ‘’article no. 14+1‘’, filling 2 would be ‘’no. 14+2‘’. Internally, everything is now deducted clearly from the correct wine / warehouse, but externally the customer only ever sees ‘’article no. 14‘’ on receipts.
You can also use this system for a constant assignment of article numbers in order to better differentiate between vintages (e.g. 10+2020 | 10+2021). In the statistics, the different fillings are still treated as individual articles and can be analysed individually.
Enter the basic data for your wine here: vintage, state, kind, quality level and flavour.
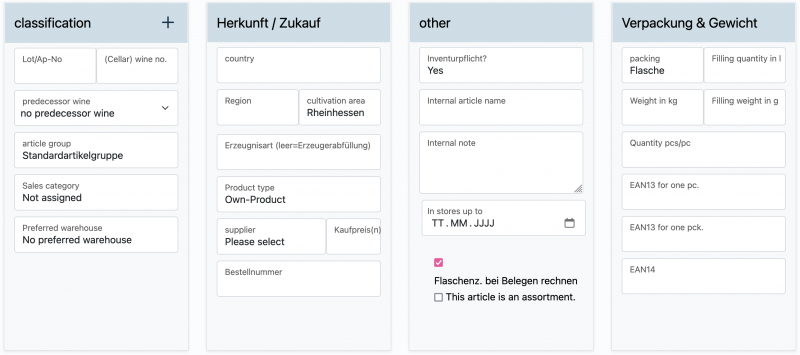
classification
Lot | AP-No.: Enter the lot/AP no. of your wine here if the new item is a wine.
(Cellar)Wine number: Enter the number of your wine here, if the new article is a wine.
Predessesor wine: The item "Previous wine" has a special meaning. Let's assume you create a new article B. The predecessor item is item A. A customer now has an order with a special price for the out-of-stock item A and now orders item B. Winestro.cloud now suggests the special price of item A, provided you have not yet assigned a new special price or list price for item B and this customer. This way you can easily memorise special conditions. You will be informed about this process with a small note when you add the item to an order.
This point should not be misunderstood as: ‘Copy all information from an old item to this new one’. To do this, use the ‘Copy article’ function in the article view (where you also assign the prices) of the article to be copied.
article group: Select an article group here that you would like to assign to your new article/wine. You can find out how to create article groups and what purpose they fulfil in the wiki article Article group.
Sales category: Select a suitable category for your product here and assign it to the product.
Preferred warehouse: Set the preferred warehouse from which this item should be drawn when entering an order. This warehouse setting overwrites the standard warehouse from the System settings.
origin
Country: Here you can enter the country of production of the product.
Region: Here you can enter the region of production of the product.
cultivation area: Here you can enter the growing region where the product is grown.
purchase
Shop-producer:
Product type: The ‘Product type’ option only suggests ‘Self-produced’ in the default setting. If you sell products that you have not produced yourself, you can create a new Customer beforehand and tick the ‘Producer’ box when creating it. From now on, this producer will be available for selection as a producer in the drop-down menu.
Supplier: If you sell products that you obtain from a specific supplier, you can create a new Customer beforehand and tick the ‘Supplier’ box when creating it. This supplier will then be available for selection as a producer in the drop-down menu.
Purchase price(s): If it is an additional purchase, you can enter the corresponding purchase price here.
Order number: Enter the order number here if you have purchased the product.
other
Inventory obligation?‘’': Here you enter ‘yes’ or ‘no’, depending on whether an inventory obligation exists for this item.
Internal article name: Here you can still assign an internal name, which you can then use to search for the item.
Internal note: Here is space for an internal note for this item, which can then also be viewed in the overview of the item index.
In shops until: Set the date here until when the item should be active in your webshop.
This item is an assortment: If you tick the box here, you will convert the item index card a little and thus have the option of maintaining an item assortment in it (e.g. spring package), to which you can then assign individual items.
Stock overbooking: This field must first be activated under System - Settings - Invoice for it to be displayed here.

Here you can specify whether or not the stock of your items may be negative.
If you set ‘Prevent total overbooking of articles’ here, the new field ‘Stock overbooking’ will appear under ‘Other’ when you create an article. This means that you specify that your stock may not be overbooked, but that it is permitted for certain items.
Here you can then choose between ‘No’, ‘Free stock can be overbooked’ and ‘Stock can be overbooked’.
This setting is useful, for example, for items that have no ‘real’ stock, such as shipping costs or similar.
packaging&weight
packing: Here you can set the type of packaging in which the corresponding item is packed or the unit in which it is calculated. You have the option of adding further packaging types to the list under Item group packaging.
filling quantity in l:You need the litre specification if the article is to be offered for sale at Winestro or in your Privatshop.
weight in kg: Entering the weight will help you to create accurate loading lists later on.
filling weight in g: Here you can enter the filling weight for articles for which you cannot specify a filling quantity in litres.
quantity pcs/pc: Enter the number of items per packaging unit here, e.g. 6 bottles/carton.
EAN: Here you can store the EAN codes (pcs/pcs) for the use of a barcode scanner and for labelling on receipts (auto fields).
analytical values
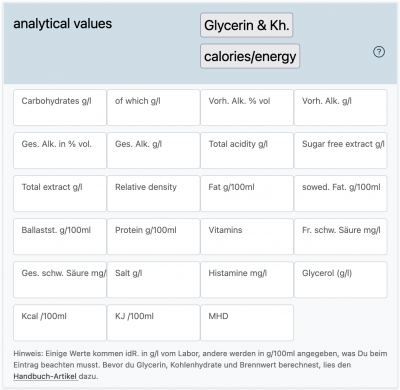
Enter all laboratory values for your wine here. The data maintained here serves as the basis for your linked webshop, as well as for the e-label, which you can also create from Winestro.Cloud to display the nutritional value table.
Document description and texts for platform and online shops

The article description is used in orders and on the generated documents. Winestro.Cloud first automatically generates a suggested description based on the information entered. For example, the values 2010 | Riesling | dry .... are used to create the document line ‘2010 Riesling dry’. This can save time when creating a new vintage. However, you can easily change the description here as you wish. In any case, please fill in the item name field and you can optionally add the item description. This field is particularly useful in assortments to store the items contained in the assortment once so that they can also be viewed on the vouchers. If you use Winestro.Cloud's multilingual capability, you can change the language in the tabs above the fields. The item is then listed in the required language on documents.
In this area you can enter a text for your Private Shop and for Winestro.Shop, which will be displayed as information for this wine.
Ingredients list & QR label and expansion & consumption
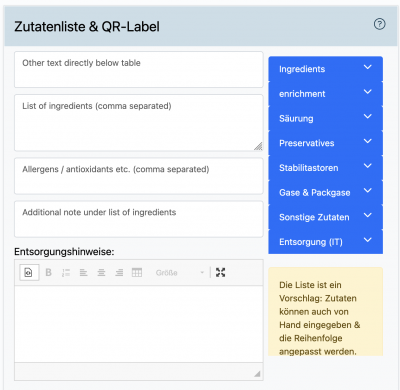
In addition to the nutritional information, you can also enter the list of ingredients, other information and, for example, the best-before date for juices.
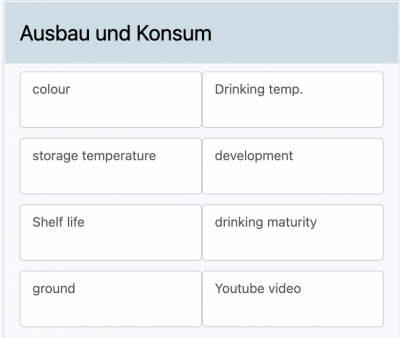
Enter interesting data on the colour, drinking temperature, storage temperature, development, shelf life, drinking maturity and ground (origin of the vine) of your wine here. Among other things, this will affect the information in your linked webshop. You also have the option of linking your own YouTube video here (insert link), which will be stored there when you use Winestro.Shop.
product groups und fibu accounts
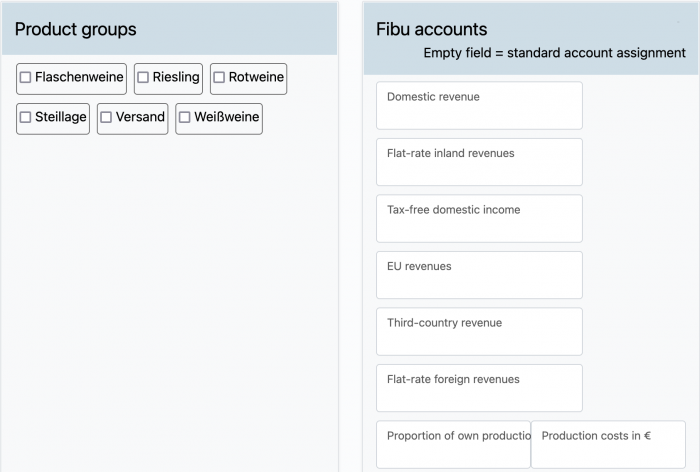
Here you can assign the item to one or more product groups. You can find out how to create a new product group and what it does here.
Here you can store individual revenue accounts for individual items if these differ from your standard revenue accounts. All comprehensive information about the FIBU interface can be found directly here.
Saving a new article
To create and save the article, click on the ‘’‘Save’‘’ button at the bottom. You will then be automatically redirected to the item index card of the newly created item. Prices, shades, awards and much more can be entered there.
Create other articles (wine tastings, tours)
If you would like to create articles from other categories (such as wine tastings or tours) in addition to your wines, the procedure is identical. In the item tab, you define a name, a description and a price as usual. Simply leave out any information that you do not have for this type of item. For the sake of clarity, you can also assign these items to a separate item group and/or make a corresponding note (an abbreviation) in the item number. Be sure to pay attention to the various setting options in the article index, such as the ‘Include number of bottles’ option, which varies depending on the article type.
copy function
To copy an article, go to the index card of the article you want to copy. There you will find the icon ‘’‘’Use this article as a template for a new article‘’‘’ in the button bar to copy the article. As soon as you click on this button, you will be taken to the screen for creating an article - but this is already filled with all the values from the previous article. You can now change the details as you wish. You can also select further options when copying (see image).
Frequently asked questions and problems
Can I convert an article into an article assortment at a later date?
You can convert an existing item into an assortment even after it has been saved. However, you should be careful not to convert existing and perhaps even already sold articles into another/new article, as otherwise you will have different products under one article number and this can lead to errors and misunderstandings in your statistics and possibly also in your financial accounting. Therefore, create a new item file with a new item number for each new item. Items that you no longer use can simply be marked as ‘’‘out of stock’‘’. Selbstverständlich musst Du "normale" Artikel, welche Du einem Sortiment hinzufügen, möchtest nicht erneut anlegen, um sie dem Sortiment anzufügen.
Number of bottles is not included in loading lists
This happens if you create a normal article as an assortment by mistake. At first glance, this is not noticeable. The assortment has a normal stock and can be sold as normal. On loading lists (and when specifying the number of bottles), however, the bottles contained in the assortment are always counted - in this case 0 bottles and 0 kg. Accordingly, the loading lists no longer fit.
Solution: Edit the corresponding article and remove the tick next to ‘’‘’This article is an assortment‘’‘’
Existing orders and invoices do not change. The problem therefore remains for these - however, everything is now correct for new orders and invoices.
Deleting assortments
Like ‘normal’ articles, assortments cannot be deleted after they have already been used on an invoice. Here too, simply mark the assortment as out of stock.
Adding items to the assortment at a later date
To do this, open the item index card of the item you have created as an assortment (icon with the magnifying glass symbol). Then scroll down a little to the ‘Items in this assortment’ area. There you can add further items to the range and edit existing items by clicking on the pencil icon. Always make sure that you adjust the ‘Quantity’ and ‘Sales %’ fields accordingly.
