En:New order: Unterschied zwischen den Versionen
Shari (Diskussion | Beiträge) |
Shari (Diskussion | Beiträge) |
||
| Zeile 150: | Zeile 150: | ||
=== Discount === | === Discount === | ||
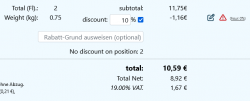
[[Datei: | [[Datei:Discount.png|250px|thumb|left|discount]] | ||
You can set a discount for the entire order. To do this, tick the Discount box. If the customer has entered a standard discount, this will be suggested. You can define a customer-specific standard discount when [[Neuer Kunde|you Create]] or edit a customer. Click on the tick to assign a total discount. This can either be specified as a percentage or you can click on the pencil to specify an absolute amount (this is then converted into a percentage). You can enter an optional reason for the discount. The customer's standard discount is also displayed there. <br><br> | You can set a discount for the entire order. To do this, tick the Discount box. If the customer has entered a standard discount, this will be suggested. You can define a customer-specific standard discount when [[Neuer Kunde|you Create]] or edit a customer. Click on the tick to assign a total discount. This can either be specified as a percentage or you can click on the pencil to specify an absolute amount (this is then converted into a percentage). You can enter an optional reason for the discount. The customer's standard discount is also displayed there. <br><br> | ||
=== print === | |||
[[Datei:Print manager.png|400px|thumb|right|print]] | |||
The printer is basically a small '''print manager''', with the restriction that all documents for a job can be conveniently merged here (and then also printed). Hover over the shortcuts to read what they stand for, e.g. Invoice. Everything else can be read in the [[Druckmanager|print manager]] area. | |||
Version vom 2. Oktober 2024, 09:44 Uhr
| How to find this page: |
|
Create a New Order
Order List
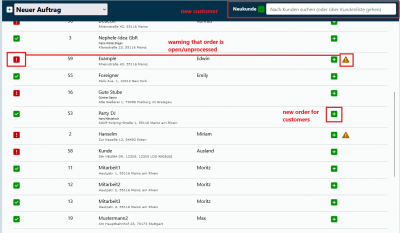
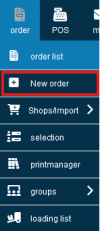
In the main menu, select under Order - New Order. Here, you will see an overview of all customers with a search field. Now, select the customer for whom an order is to be created by clicking on the Plus icon. You will then be automatically redirected to the page to edit the order.
To find your customers more quickly, you can search for them instead of having to scroll laboriously through the list. If the customer does not yet exist, you can click the green Plus icon next to the search bar to directly create new customers.
If only one customer remains in the list of search results, pressing the ENTER key is enough to create an order.
Customer File
Of course, this is not the only way to create a new order.
You can also create a new order directly from the customer file, allowing you to continue working in the program from wherever you are. Here, you can click on the green paper with the green Plus icon and create a new order.
Customer Selection
Through customer selection, you can also create new open orders in bulk for all selected customers in the third step under the "Order" tab.
Convert Reservation to Order
Another option is to convert reservations into orders. This can be done from the customer file under the "Reserv." tab or from the reservation module.
Editing Mask
When you have created a new order, the program automatically switches to the order editing mask, where you can set all the details.
How to edit an order can be found in this article.
Import Order
You can import an old order into a new one using the drop down menue.
This feature is useful if customers want to order the same goods they purchased from your vinotheque six months ago.
However, not only can orders from the same customers be imported, but also from other customers. For example, I, as your customer, can request the same order as customer Jamie Doe, and you can easily search for that order and import it.
Copy order
If you would like to create the same order for other customers, you can assign an old order to new customers by clicking on the icon copy order and duplicate it. Only the modalities of the order are copied. The customer file of the original order remains untouched. The new duplicated order can therefore only be assigned to existing customers by clicking on the orange icon with the two sheets of paper.
Explanation Video
We also have a video for this article that clearly explains the topic.
More about the order editing function can be found here Auftrag bearbeiten
Overview of the order mask
The Winestro.Cloud order screen offers a wide range of options. For this reason, we have mentally divided the screen into three areas (left, centre, right) for a clear explanation, as you can see in the graphic. In the following description, we will work our way through the screen from left to right.
left block
Icons
Loading files into a customer file
to the booking calendar
Create new task
Checkout
Send receipts to customers by e-mail
Send all previously created receipts by e-mail
Send dispatch notification via e-mail
Send order confirmation via e-mail
for incoming payment control
Adapt order data to current customer and system data
Select further actions
Import order
copy order
Sometimes it is necessary to copy orders and recurring business transactions from customers. To do this, go to the index card of an order and select the copy symbol . You can now specify which customer the new order should be assigned to. The new order is only copied with the article information. Invoices and all other documents must be created again.
Block order
When you have finished editing an order and want to prevent other employees of your company from accidentally making changes to the order, go to "Select further actions" and select Lock order . Conversely, you can also unblock the order again afterwards: .
Customer
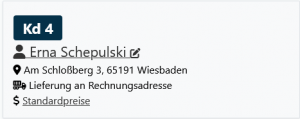
Under the icons you can recognise the customer number, name, billing address, delivery address and price group of the customer. By clicking on the customer name, it is now also possible to go directly to the customer index card. Below this is the free text field for individual notes, which you can easily maintain in the order. You can display the price group by clicking on it again. The price category influences which price is automatically preselected for this customer. If the item does not have a price in this price category, the first price category is automatically selected. In this case, a short message about this process appears. There is also a note below this if the customer is in arrears with payment.
Below the note field there are various Assignment options. These may vary depending on which modules you are working with. Use the respective dropdown to assign the order to the appropriate sales channel, a self-defined campaign (e.g. farm festival) or the delivery type, for example.
center block
The centre block is used as a "Scrap paperr" for recording the items. Nothing is initially entered on a receipt here. The middle block already has a number of options in the upper area, which will be discussed first below. This is followed by further explanation using the five individual tabs: Items, Printer, Text, Settings and Slips.
special item
Special items are items or articles that you do not have directly in the range, but that you create once in the order. To create a special item in an order, simply click on the special item symbol. Here you can enter the 1st and 2nd document line, VAT. Quantity and price. You can also specify whether the price should be net or gross and whether the "number of bottles should be included". If you do not tick this box, the special item will NOT appear on your delivery note.
Special items can also be analysed later under special items.
If you sell items as special items, these are summarised in one item (special item). Here you can mark an item as an hourly special item, for example, to record the total sales, but you cannot differentiate between the individual items.
Rabatt
Strictly speaking, discount items are only negative special items. This means that an absolute discount can be processed in an order. The basic principle of inserting a discount item is similar to that of special items. Here too, you enter the 1st and 2nd voucher line, VAT, quantity and price. However, you can also specify a percentage value which then relates to the order.
Versandkosten
Shipping costs can be entered here.
You can create the shipping costs as a special item or, if you have created the shipping marker in an item, it is automatically transferred to the order.
If you mark an item in the Item tab as "Standard shipping item" (bottom centre), it will automatically be stored when you click on the shipping costs. Creating a standard shipping item removes the tick from all other standard shipping items
Notes on shipping costs Shipping costs and additional costs share the fate of the remaining items. For example, if you send books with 7% VAT, you must add 7% to the shipping costs. If you send wine for 19%, you also add 19%.
Trenner
A separator line divides the voucher (as the name suggests). For example, you can create a better overview of the vouchers and also group items visually and place additional information and notes on the vouchers. It is now also possible to insert a subtotal in net or gross here.
Insert positions
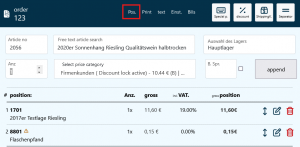
When you call up order processing, the field for the article number is automatically activated. If you enter a correct article number in this field, the corresponding price is automatically selected for the article and the customer. Now press the Enter key to jump to the Quantity field. Here you can enter the quantity. If you now press Enter again, the article will be inserted, but you can also set a special price beforehand.
If you do not know the article number for an article, click on the Free text article search field to see all articles in the current sales stock and select them individually. The colour codes for the respective article group are now displayed at the front of the Article numbers. In addition, you will now also find information about the availability of the price group and have the option of adding the item to the order using the "green plus symbol". The article groups with a high ranking are displayed first. You can read how to change article groups and their colours and how to set the ranking in the Article group chapter.
In the "Free text article search" field, you can start a text search through your articles. Simply enter parts of the article name in the text field, here you can also see whether the price group is available. It is now also possible to navigate through the article lists using the arrow keys. To add items to the order, click on the green plus symbol. If only one result is displayed, you can also select the item by pressing Enter. In both cases, you can then specify the ‘’quantity‘’ and the price as usual.
In addition, you now have the option to choose between your different warehouses, provided you have entered several in Winestro. You therefore have the option of deciding from which warehouse the entered item should be drawn, with the total stock and the free stock from the selected warehouse being displayed on the top right-hand side. With a click on Stocks
edit position
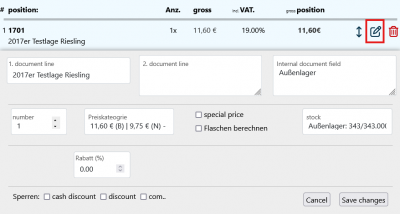
To subsequently edit an item from an order, click once on the pencil next to the respective item. Here you can now customise the 1st and 2nd voucher line or create an internal voucher field. In addition, it is now also possible to adjust the number of bottles and the price category, set a special price and decide whether the bottle price should be included in the order. The order processing options vary depending on the package you are using.
You can drag and drop the items within the order using the arrows.
To create a special price for this item, tick the "Special price" box. A new field appears in place of the final price, in which any price can then be selected.
You can also change the name of the item or the description (this does not affect the allocation of stock postings).
An item discount can be assigned by simply entering the desired percentage.
When you have finished making changes, click on Save changes so that your changes are applied to the order.
Discount
You can set a discount for the entire order. To do this, tick the Discount box. If the customer has entered a standard discount, this will be suggested. You can define a customer-specific standard discount when you Create or edit a customer. Click on the tick to assign a total discount. This can either be specified as a percentage or you can click on the pencil to specify an absolute amount (this is then converted into a percentage). You can enter an optional reason for the discount. The customer's standard discount is also displayed there.
The printer is basically a small print manager, with the restriction that all documents for a job can be conveniently merged here (and then also printed). Hover over the shortcuts to read what they stand for, e.g. Invoice. Everything else can be read in the print manager area.
