En:Print manager: Unterschied zwischen den Versionen
Shari (Diskussion | Beiträge) Keine Bearbeitungszusammenfassung |
Shari (Diskussion | Beiträge) Keine Bearbeitungszusammenfassung |
||
| Zeile 9: | Zeile 9: | ||
|} | |} | ||
The print manager provides you with all documents for orders as a single document, so you can save yourself the hassle of printing out individual documents, and also allows you to download receipts in batches as a ZIP archive. Winestro.Cloud has two different print managers - you can find the other one, specifically for parcel labels, via the [[ | The print manager provides you with all documents for orders as a single document, so you can save yourself the hassle of printing out individual documents, and also allows you to download receipts in batches as a ZIP archive. Winestro.Cloud has two different print managers - you can find the other one, specifically for parcel labels, via the [[en:Creation of parcel stamps]] | ||
== structure == | == structure == | ||
| Zeile 48: | Zeile 48: | ||
==== Selection ==== | ==== Selection ==== | ||
Selections can be selected directly in the print manager so that printing can be carried out according to these. This means that you do not have to take the diversions via the [[ | Selections can be selected directly in the print manager so that printing can be carried out according to these. This means that you do not have to take the diversions via the [[en: Selections|selection]], but can act directly from the print manager. | ||
== Direct debits == | == Direct debits == | ||
Aktuelle Version vom 17. Oktober 2024, 09:44 Uhr
| How to find this page: |
| order list |
| print manager |
The print manager provides you with all documents for orders as a single document, so you can save yourself the hassle of printing out individual documents, and also allows you to download receipts in batches as a ZIP archive. Winestro.Cloud has two different print managers - you can find the other one, specifically for parcel labels, via the en:Creation of parcel stamps
structure
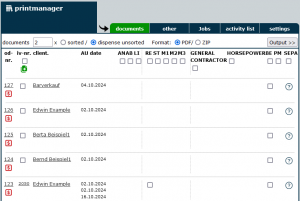
The documents must first be created in the Orders before they can be printed directly via the print manager. Alternatively, specific invoices can also be created directly in the print manager first. To do this, the white box on the left of the line must first be ticked and then the green "Create invoice" icon clicked. The boxes for selecting the invoices to be printed then appear on the right-hand side.
If you see a white box under the document type on the right, the document has already been created for the order and you can now print it out. If you see a yellow question mark, you have not yet created a document for the order. such a document for the order. The documents are arranged in columns as follows. Select a box under an abbreviation to select or deselect the entire column.
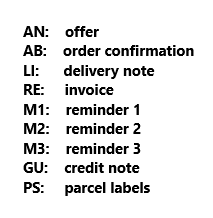
tip: if you don´t know a abbreviation meaning, you can easily move the mouse over the sympols and it will tell you the meaning of it.
Outputting documents
Now select the documents that you want to print or output. You can now choose how often each document should be printed. By default, the print manager uses the specification you have selected in the Settings. Also select whether the documents should be summarised in a multi-page PDF or as individual PDFs, collected as a ZIP archive. Then click on Output. Tip: Don't understand the abbreviations? No problem: Simply hover over them with the mouse or look at the legend in the wiki (illustration on the right).
other
If you have already output a document as a PDF in the print manager or in the document overview of an order, it is highlighted in green in the print manager. In the ‘Other’ submenu, you will find further lists for printing. For example, you can a list of all open orders (sorted by order or customer no.) as well as stock and transaction lists for your articles.
Jobs
If you select several documents in the Print Manager that are to be output at once, a ‘job’ is created from this. This creates a download "job" in which all the data you have selected is downloaded, which can take up to 10 minutes. You can view all these print jobs by clicking on ‘Jobs’. Once the file has been downloaded, it can be opened using the print icon.
Transaction lists
In the transaction list you will find all the most recent transactions relating to your orders (invoices). These can be output sorted/unsorted and their quantity can also be restricted or extended.
settings
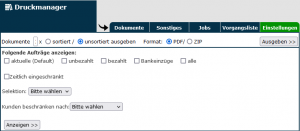
In the print manager settings, you can select which documents are to be displayed. For performance reasons, the default settings only ever select the current orders. These usually provide you with all important documents. If, for example, you want to print all receipts for a year, you can also select ‘All’ here and limit the selection in terms of time if necessary. ‘’Please note that too large a selection can cause your browser / PC / PDF reader to crash (depending on performance) or the process can result in long loading times!
Selection
Selections can be selected directly in the print manager so that printing can be carried out according to these. This means that you do not have to take the diversions via the selection, but can act directly from the print manager.
Direct debits
Under the item SEPA (formerly DTA) you can have the SEPA details for the direct debit output in a joint document for all selected orders.
Explanatory video
There is also a video for this Wiki article which explains the topic clearly.


