En:Edit order
| How to find this page: |
| current |
| Click on the pencil icon |
Explanation Video
We are currently working on adapting this Wiki entry to the new order interface. However, you can already find all important updates here in the YouTube video:
Overview of the Order Interface
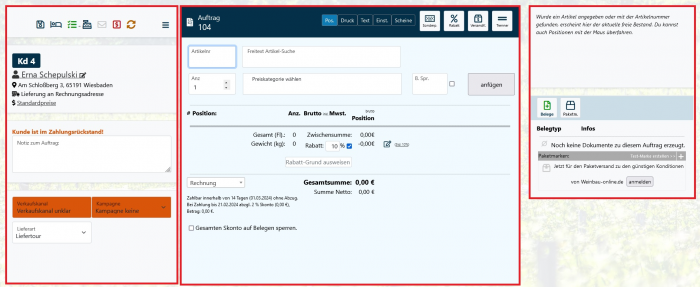
The order interface of Winestro.Cloud offers a variety of possibilities. For a clear explanation, we have mentally divided the interface into three areas (left, middle, right), as you can see in the graphic. In the following description, we will work through the interface from left to right.
Left Block
Icons
Load files into a customer file
to the booking calendar
Green checkmark with bullet points: create new task
to the checkout
Send receipts via email to customers
to payment control
Adjust order data to current customer and system data
select more actions
Import customer/item data
Copy order
TIP: Lock Order
When you finish editing an order and want to prevent other employees in your company from accidentally making changes to the order, go to the burger menu and select Lock Order . Conversely, you can also unlock the order afterward:
Customer
Below the icons, you will see the customer number, name, billing address, delivery address, and price group of the customer. By clicking on the customer name, it is now possible to go directly to the customer file. Below is the free text field for individual notes, which you can easily maintain in the order. With another click on the price group, you can view it. The price category influences which price is automatically pre-selected for this customer. If the item has no price in this price category, the first price category is automatically selected. In this case, a short message about this process will appear. Below, there is also a notice if the customer is in arrears.
Assignments
Below the customer information, there are various assignment options. These may vary depending on which modules you are working with. Assign the order here to the appropriate sales channel, a self-defined campaign (e.g., farm festival), or one of your loading lists for the next delivery tour via the respective dropdown.
Grouping of Orders
Order groups allow you to group your orders into specific areas. These groups can then be grouped together using overarching categories, similar to what you might already know from customer groups and customer group categories. You can freely define and create order groups and categories as needed.
Middle Block
The middle block serves as a "notepad" for recording items. Nothing is fixed on a receipt here yet. The middle block already has several options in the upper area, which are first addressed below. Following that, further explanation is provided based on the five individual tabs: Positions, Printer, Text, Settings, and Vouchers.
Special Fields
Special items and shipping positions should always be more of an exception than the rule. It is generally recommended to create a regular item whenever possible rather than working with special positions or shipping costs. This allows for better statistical analysis at the end of the year.
Special Items / Special Posts
Special items are positions or items that you do not have directly in stock but create once in the order. To create a special item in an order, simply click on the Special Post icon. Here you can specify the 1st and 2nd document line, VAT, quantity, and price. Additionally, you can also specify whether it is a net or gross price and whether the "bottle count" should be included. If you do not check this box, the special post will NOT appear on your delivery note. Special items can later also be analyzed under special items. If you sell items as special posts, they are combined into one item (special post). Here you can mark an item as a standard special post to capture all sales, but you cannot differentiate between which items were involved.
Specify Discount
Discount positions are essentially just negative special posts. This allows for the processing of an absolute discount in an order. Inserting a discount position works similarly to special positions. Here too, you specify the 1st and 2nd document line, VAT, quantity, and price. You can also set a percentage that applies to the entire order.
Vouchers
Vouchers can be of different types in Winestro.Cloud. There are specific purpose vouchers and multi-function vouchers. As the topic is quite complex, it is best to read the Wiki article on this topic.
Shipping Costs
Shipping costs can be entered here. You can create the shipping costs as a special post or, if you have set a shipping marker in an item, it will be automatically transferred to the order.
If you mark an item as a "standard shipping item" in the item file (bottom center), it will automatically be applied when you click on the shipping costs. Setting up a standard shipping item removes the checkmarks from all other standard shipping items.
  Notes on shipping costs: Shipping costs or additional costs share the fate
  of the other positions. For example, if you send books with 7% VAT, you must also charge 7% on
  the shipping costs. If you send wine with 19%, you must also charge 19% on it.
Separator Line
A separator line separates (as the name suggests) the document. This allows you to create better organization on the documents and visually group positions and add additional information and notes on the documents. You can now also insert a subtotal in net or gross.
Insert Positions
When you call up order processing, the field for the item number is automatically activated. If you type a correct item number in this field, the corresponding price is automatically selected for the item and customer. Press the Enter key to jump to the quantity field. Here you can specify the quantity. If you press Enter again, the item will be inserted, but before that, you can also set a special price.
If you do not know the item number for an item, click on the "Free text item search" field to see all items in the current sales inventory and select them individually. The color codes for the respective item group are now displayed in front of the item numbers. You can also now see information about the availability of the price group and have the option to add the item to the order via the green Plus icon. Item groups with a high rank are displayed first. How to change item groups and their colors and how to set the ranking is described in the item group chapter.
In the "Free text item search" field, you can start a text search through your items. Just enter parts of the item name in the text field; you can also see if the price group is available here. You can now also navigate through the item lists using the arrow keys. To add items to the order, click on the green Plus icon. If only one result is displayed, you can also select the item with Enter. In both cases, you can then specify the quantity and price as usual. Additionally, you now have the option to choose between your different warehouses, provided you have entered several in Winestro. You can therefore decide from which warehouse the entered position should be drawn, and the total stock and the free stock from the selected warehouse are displayed on the upper right side. By clicking on the "three boxes icon," the stock file opens, or by clicking on the "bottle icon," the item file opens. When you hover your mouse over the different positions, the information about item management is displayed on the right side.
Special Prices from Old Documents
If you used a special price for this item (or a predecessor item) in the last invoice for your current customer, this special price will also be listed and automatically selected. Once you charge the customer a regular price again, the special price will no longer be suggested.
This behavior can be changed under System / Settings / Orders "Price suggestion from old orders."
Edit Positions
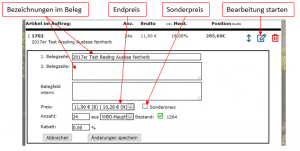
To edit a position in an order afterward, click once on the pencil icon for the respective position. Here you can now adjust the 1st and 2nd document line or create an internal document field. Additionally, it is now also possible to adjust the bottle count and price category, set a special price, and decide whether the bottle price should be included in the order. The possibilities of order processing vary depending on the package you use.
You can move positions within the order using drag and drop or by clicking on the item and specifying the position number. To set a special price for this item, activate the "Special Price" checkbox. A new field will appear in place of the final price, where any price can be selected. You can also change the item name or description (the assignment of stock bookings remains unaffected). A position discount can be granted by simply entering the desired percentage. When you are done with all changes, click on save changes to apply them to the order.
Documents/Receipts
Under the "Documents" tab, you will find all the documents you have created for this order.
For documents to appear there, they must first be created, which is possible via the "green Plus" located to the far left at the height of the icons.
Documents and receipts are based on the positions you have previously added. You can edit them as desired by adding or removing positions.
Invoice
You can create an invoice via the "green Plus," located to the far left at the height of the icons.
As long as you are not officially approved, orders can be easily modified. Just make the changes to the order and click on the two small green arrows next to the printer to update the receipt (You must, of course, first unlock any order lock you may have imposed by clicking on the right icon in the toolbar.).
Once an invoice has been created, it cannot be deleted (to prevent gaps in the numbering!). You can assign the order to a new customer (toolbar) and modify it. Then just update it as described above.
Of course, the invoice is not the only document in Winestro.Cloud. You can read more about documents in Winestro.Cloud in the Wiki article.
Import Order
This field takes you to an overview similar to Neuer Auftrag. Here you can select an existing order and import all positions into the current order. The order from which the import is made remains unaffected by this action. This feature allows you to settle multiple listed orders (e.g., the last 5 deliveries to a business customer) with one invoice. More about this under Sammelrechnung.
Discount
You can set a discount for the entire order. To do so, activate the discount box. If the customer has a standard discount entered, it will be suggested. You can set a customer-specific standard discount when creating or editing a customer. Click the checkbox to grant a total discount. This can be specified either as a percentage or by clicking on the pencil icon to specify an absolute amount (this will then be converted to a percentage). You can optionally provide a reason for the discount. Additionally, the customer's standard discount is displayed there.
If you add one or more non-discountable items to the order, the total discount is converted into position discounts. Of course, all items with a discount block are excluded from this.
Quantity Discount
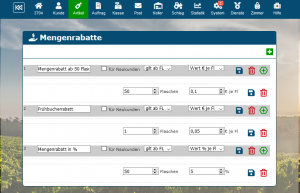
Starting from the Complete Package, you can grant a quantity discount. You set the minimum quantity and discount yourself (see image "Quantity Discount"). Under Items - Item Group - Quantity Discount you create a new discount scale. There you name the discount scale, specify whether it is given from a certain value or a certain quantity. You also choose whether the value is granted as an absolute amount or as a percentage. By clicking on the Plus in the newly created discount scale, you set the limit for the scale price. For example, you specify that from 50 bottles there is a discount of €0.10 per bottle. This discount must be activated in the customer's file (under Prices and Bank Accounts) for it to appear later in the order. Alternatively, the activation also works via customer selection.
When an order is created for a customer with an assigned quantity discount, it still needs to be added manually. In the order interface, the button for the discount position is automatically highlighted in green. By clicking on it, the quantity discount can then be added - the text and amount will be suggested. (With the next update, quantity discounts will be automatically added to the order)
Important: Discount blocks cannot be considered in the discount scale.
Cash Discount
Cash discount is calculated and shown on the invoice when needed and with the appropriate presettings. Read more about this under Skonto.
Order Settings
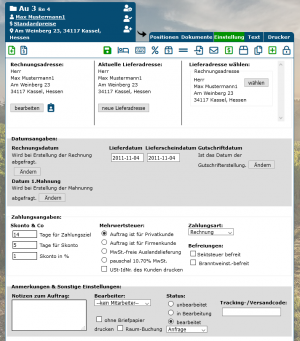
You can access the settings by clicking on the "Settings" tab in an order.
Addresses
Here you can change the delivery and billing address for this order again. Please note that a change of address in the customer record is not transferred to existing orders. However, you can update all order data to the current system status by clicking on . Alternatively, you can also delete individual documents under "Documents" and create them anew to include the new address.
Payment Details
Under the payment details, you can change the discount and standard payment terms. You can also specify which VAT information should be shown on the invoice. The default settings for VAT and discount result from the information you entered for the customer. If you show VAT flat rate, you can also decide whether net or gross prices should be displayed. For example, if you choose gross prices, 9.5% VAT will be shown on the invoice, but the gross price of the item will be as high as if it were shown with 19%.
You can also assign a reference number to the order. This can be printed on the documents.
Notes and Other Settings
Here you can leave a note for the order or specify which employee is responsible for this order. You can also manually change the order status here.
Additionally, reference numbers or tracking numbers can be assigned to this order. The field for the reference number must first be activated under System - Settings - Orders.
Date Settings
The invoice, credit note, delivery note, and delivery date can also be changed here. Depending on your system settings, the document date is either firmly set to the date of creation, uses the setting from this field, or the invoice date is queried separately when the document is created.
Commissions
If a commission recipient is entered for this customer, it will be displayed here. If you now generate an invoice for the order, the program automatically generates a commission claim for each commission recipient using the percentage you have set. You can settle these commission claims later (You can also delete individual commission claims beforehand.).
Dunning Settings
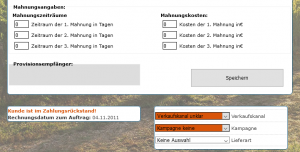
Here you can individually adjust the dunning periods and costs for the order again. The settings here are initially taken from the general dunning settings.
Cancellation
A cancellation for an order can also be created using the icon used to create all other documents.
Settings for the cancellation cannot be made in the order. It cannot be edited and instead creates a negative invoice for the entire order.
Document Texts
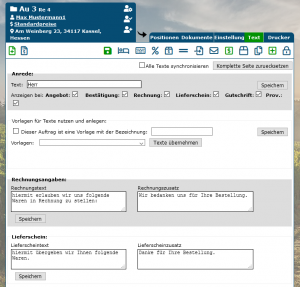
Under ![]() you can edit all text information for this order individually. The salutation is generated from the customer information, and the remaining texts are taken from the current system settings (unless you are using the extension customer-specific document texts.). Changes you make here apply only to this order. Alternatively, you can save the changes as templates or load already created templates under Templates for Texts.
you can edit all text information for this order individually. The salutation is generated from the customer information, and the remaining texts are taken from the current system settings (unless you are using the extension customer-specific document texts.). Changes you make here apply only to this order. Alternatively, you can save the changes as templates or load already created templates under Templates for Texts.
Printer
The printer is basically a small print manager, with the limitation that here all documents related to an order can be conveniently combined (and then also printed). Everything else can be read in the print manager section.
Function of the Icons
Under the tabs, you will find a variety of icons that help you quickly and conveniently perform certain functions. The following is an explanation of a selection of the icons:
Add Shipping Costs
You can add shipping costs to an order via this icon without the need for another item or any other effort. Just click on the corresponding icon, and the respective shipping costs will appear on the invoice.
Insert Separator Line
If you want to indicate that there is a separation within the order or if you want to make the order overall clearer, it makes sense to insert a separator line. When you click on the corresponding icon, a separator line will be drawn under the last added item.
Import Order into This Order
If customers want to reorder an identical order or exactly the order they purchased in the vinotheque a year ago, you can import an order you have already created and save yourself a lot of work. Not only can orders be imported for the same customers, but an order created for customer X can also be imported for customer Y.
Create Package Label
This icon allows you to create a suitable package label directly in the order. The contact details are taken directly from the order so that you have as little work as possible.
Use Direct Debit
After creating the invoice, you will see the order with a blue € symbol in the list of unpaid orders (if the customer's bank details with IBAN and BIC have been correctly entered). You can now click on it and receive a SEPA file that you can import into your banking program. Alternatively, you can also do this manually in the software for your bank. Please read the instructions from your bank for the import procedure into your banking software.
Payment Control
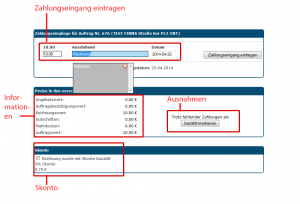
You can access the payment control by clicking on the dollar symbol in the button bar. Here you can enter incoming (partial) payments for an order or invoice. This gives you an overview of all payments made in the statistics under entries. Additionally, full payment of the amount automatically moves the order to the paid orders (Auftragsliste). You can also mark the invoice as paid without receiving payment (Be careful of tax implications!). If you are working with a cash discount, you can also indicate whether the invoice was paid with a discount. The cash discount amount is automatically calculated from the amount specified in the invoice.
Frequently Asked Questions and Problems
SEPA (formerly DTA)
SEPA files for direct debit and texts cannot be mixed. Either issue a SEPA or a text.
Delete Order
You can only delete an order as long as no invoice has been created for it. After that, deletion is no longer possible. You can find the delete icon in the order overview list.
No Effect of Changes to the Order / Settings
As a general rule: Each time you create an order, the order "pulls" all the settings once. This is to ensure that even if you change something, the order always looks the way it did at the time of creation.
If you reassign the order to the customer (two green arrows + customer symbol), the settings are reloaded (e.g., a new letterhead or similar).
Letterhead Only for Emails
In general, you can specify in the settings whether the letterhead should also appear when printing or only when sending via email. (System / Documents / Invoice / Advanced Settings (at the bottom) / Use letterhead only for documents sent by email). This can then be individually adjusted for each order in the "Other" tab.
The Bottle Count is Incorrect!
Make sure that the checkbox "Include bottle count" is set in the item file (magnifying glass icon). This is often forgotten during creation, and positions such as vouchers, shipping costs, etc., can be added that do not affect the bottle count. The checkbox must be set for the bottle count to be correctly added up in the order.
Assign Order to Another Customer
In the order editing view, the order can be reassigned to another customer via the button (person with gear). Click on this to access the overview of all customers and confirm the new assignment via the button (person with pencil).
My Special Item Does Not Appear on the Delivery Note
When inserting a special item into the order, you can specify by checking a box whether the "quantity should be included." If you did not check this box when inserting, the item will not appear on your delivery note. To correct this, delete the special post and insert it again into the order, making sure to check the box. Then generate a new delivery note. The item should now appear.
Adjust Order Data to Current Customer and System Data
An important function, especially at the beginning, is the "little person with a checkmark" (see figure on the right). With this, you can adjust your order data to the current customer and system data.
If you have created one or more orders and then change something in the customer or system data, these changes will not be reflected in existing orders. If you then create an invoice and have changed something in the system data that should also be adjusted for existing orders, you must click on this little person to update the customer and system data.
Above and below the little person are two other little persons described in the figure. However, you also get information about the icons when you hover over an icon with your mouse.
