En:Loading lists
| So finden Sie diese Seite: |
| Ladelisten |
Loading lists give you a precise overview of the loading of your van during a delivery tour. Furthermore, you can define your route via loading lists and en:Optimise loading lists for the shortest route, notify customers about delivery times, define and plan your own delivery times. The packing lists contain all order data and the most important customer data. Your order overview also provides you with a total overview of the weight of the bottles and the number of parcels, as well as the total invoice value. However, this only works if you have entered the relevant details for individual item.
Via Order loading lists you can access the overview of all loading lists created so far.
In this overview you have the option:
Manually create new loading lists for a delivery tour
Edit existing loading lists
Open an existing loading list
It is also possible to archive or delete existing loading lists via the burger menu
Print an existing loading list
Create loading lists manually
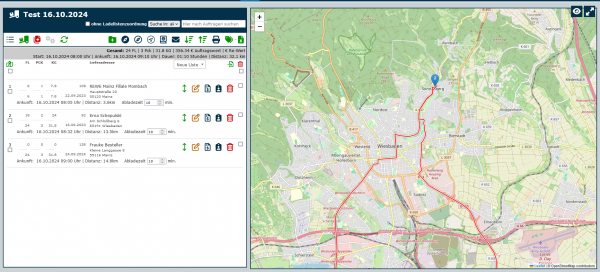
As soon as you have created a new loading list via the symbol and assigned a delivery date and a name for the loading list, you can access the detailed view of the respective loading list via the symbol. In this view, you can manually add orders to a delivery tour or loading list, customise the respective loading list and have the loading list output either to your navigation system or as a print file.
To add orders to your loading list as efficiently as possible, you can first filter the orders according to their status using the drop-down menu. For example, you can use the filter function to display only unprocessed and unpaid orders. You can then either add the unfiltered orders completely to the loading list or select individual orders via the search mask and add them manually to the loading list. Alternatively, you can also add the orders to the loading list based on the order number; this is particularly practical if you have entered all orders for a delivery tour in one go. You can use the symbol to define the lowest and highest order number to be added to the relevant loading list.
Once you have added all the desired orders to your loading list, you can use the icon to optimise the route for your en:Loading lists, and you can of course also change the order of the stops manually at any time. As soon as all the stops are in a suitable order for you, you can download the route to your sat nav or export it to en:Google Maps using the corresponding icon.
You can also use the icons to print out the loading list in the order of the stops or in reverse order.
You can use the icon to print out box labels with the corresponding customer data for each order.
Create loading list via order selection
You can find the order selection under Order - Selection.
To avoid having to add all orders to a loading list individually, which can quickly become tedious, a loading list can also be created using the en: order selection.
This not only saves time, but also ensures that no orders ‘slip through’ and are therefore forgotten. We therefore recommend familiarising yourself with the en: order selection and giving it a try.
The example in the en: order selection refers to the loading list, which is why we will not go into further detail here and you are welcome to read up on en: order selection if required.
As soon as the orders have been added to a loading list with the help of the order selection, the functions are analogous to a manually created loading list.
edit loading list
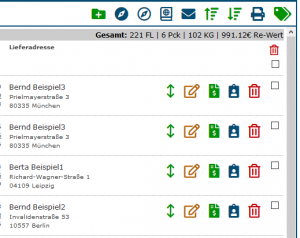
Click on the pencil icon to edit the loading list. You will first see the number of items and the expected weight for your entire delivery. Everything is set to zero and the list is initially empty, as no orders have been added to the loading list yet. To add an order to the loading list, you can search for orders via the input field and add them to the loading list by clicking on the respective green arrow. Directly next to this (via the drop-down menu), you can also specify exactly which orders or customer groups you want to search in. Under the individual orders there is also the option to insert all orders from customers in a customer group with a single click.
Another option to add orders to a loading list can be found here: A dialogue box opens in which the lowest order number to be added to the loading list is entered. As soon as you confirm, another dialogue box opens to add the highest order number to the loading list. In the centre of the list you will find further information on the order, as well as the number of bottles, weights and cartons for the individual order. On the right-hand side, the stop numbers of the orders can be moved manually using various options. As soon as is clicked, a dialogue box opens in which the correct position can be easily entered. The order can be edited and individual documents can be output via the form overview . If this symbol is still black, no invoice has yet been created for the corresponding order. [en:Customer list|Customer data]] can be adjusted via and individual/several orders can be deleted . This is recommended if you have added all open orders or all orders of a customer group without selecting them beforehand.
Google Maps As soon as all the desired orders have been added to a loading list, they appear listed in the previously empty field. If the box under the position number is ticked, the corresponding position is marked for transfer to Google Maps. Please note that Google only supports 25 stops and you may have to subdivide the list here.
There is a separate article on this topic, which can be read here.
Send Maps route to smartphone Here you will find instructions on how to send the route optimised on your PC to your smartphone in the car: https://support.google.com/maps/answer/6081481?hl=de
Print loading list
The loading list can either be printed in ascending or descending order.
Which sorting makes sense for your loading list depends on how you load your transporters:
1. you load directly from the warehouse into the transporter.
2. you first load from the warehouse into the yard and then into the transporter.
In both cases, a correspondingly organised packing list opens as a PDF. The document contains all important customer data, as well as a complete overview of all required items including quantity, an overview of individual tour sections and an address list with telephone contact.
Charging list on smartphone
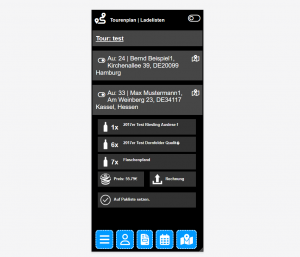
Using the en:WBO for Smartphone app on your mobile phone, you can also navigate directly to the respective stops and hide stops you have visited. By clicking on the stop, you can also see the items ordered and simply call up the invoice on your smartphone.
Outputting and creating invoices
As described above, invoices can be easily generated from individual orders via the document overview. If you want to create the missing invoices for all orders straight away, simply click on (top left above the list) and the corresponding documents will be created. Once all invoices have been created, the icon changes colour from red to green. To print out all the invoices that have been created, simply click on the printer icon .
To save time, you do not generate invoices for the orders of a delivery tour, but create and print them with two clicks from the corresponding loading list.
An existing en:loading list is initially output in the order in which the orders were added. Winestro.Cloud therefore offers the option of sorting orders with one click so that the shortest route can be taken, the transporter is loaded accordingly and customers are informed of the exact time of their delivery. You can also have this optimised route displayed directly in Google Maps or as a download for various navigation devices. The start and end point of the route will only be visible in the timetable once it has been transferred to Google Maps.
Before a route is adjusted, it is advisable to look through the orders from the relevant loading list and check the addresses of the customers (especially the postcodes). Otherwise, errors may occur during optimisation.
Once all addresses have been checked, simply click on . A dialogue box now opens from which you can select where the tour starts and where the tour ends. This option is particularly interesting if you are travelling on multi-day tours with different daily destinations.
As soon as the route has been customised, the symbol changes and turns green. If you now move the mouse over it, the time of the last route optimisation is displayed.
Directions
Once the loading list has been optimised, the next step is to inform the customer of the delivery time and date. First of all, you should take a look at the route map, which you can now click on . Here you can manually change the arrival and departure times again, for example if you already know that a longer stay is planned at certain locations. Furthermore, daily destinations can be marked and the start time and start date of the tour can be adjusted. The route map can also be printed out for your own overview.
To avoid having to write to all customers individually, simply click on the blue mail (to be found at the top right of the route map or in the loading list). A new mail template will now open. All customers for whom an e-mail address is stored are entered here as recipients. Via autofields, the customer is now notified of the delivery date of the tour and the expected delivery time. To save even more time, you can create your own Mail template, which already contains the required information.
Loading lists as cards
There are various options in Winestro.Cloud for displaying the completed loading list as a map:
1. in the loading list on the left, under the position number, orders can be marked as stop numbers for Google Maps. Please note that a maximum of 25 stops can be added to Google Maps. Click on to access the overview of en:Google Maps.
2 Click on to download loading lists for a Tom-Tom navigation device. To do this, the navigation device must be connected to the PC and the file from Winestro.Cloud must be saved on the navigation device in the ITN folder. When the device is restarted, you will find the tour Route planning, Options and Load route. Further options can also be found under en:Navi download.
3. the Map & Guide Download offers a similar help as the Navi Download, but for other navigation devices and applications with the help of which so-called points of interest can be inserted into a device. The format that is output here for export is a csv. File which is supported by many common providers. The file itself contains the addresses, the exact coordinates, as well as the total kg number of orders and the kg number of individual orders.
Old loading lists
Using the slider at the top of the loading list overview, you have the option of only displaying your current loading lists or also displaying old loading lists.
Loading list settings
If you click on the cogwheels in the top left of a loading list, you will be taken to the System settings. Here you can initially define the following points:
| * Packaging unit (box size), for delivery by loading list. |
| * Number of cartons at which a loading list begins with a new delivery. |
| * Number of bottles at which a loading list begins with a new delivery. |
| * KG at which a loading list begins with a new delivery. |
| * Factor by which the journey time differs compared to a car: during route optimisation, the originally calculated time is multiplied by the factor entered. |
| * Loading lists PDF also shows order items: If this box is unchecked, the order numbers and item descriptions are omitted when printing the loading list. |
Frequently asked questions
How can an overnight stay be displayed in the tour calculation of a loading list?
As you have already correctly surmised, you can simply create a new loading list to display the overnight stay.
Another option (so that you can quickly reschedule and re-optimise during the tour if necessary) is as follows: At the last stop, set an unloading time of 720 minutes, for example, to allow for a 12-hour ‘break’ and have it calculated accordingly when optimising the tour.
A little tip: Create the overnight location as a customer or delivery address and simply create an empty order for this so that you can add it to the loading list and drive to it.


