En:Juice accounts
The juice accounts function makes it possible to accept products such as apples, grapes, etc. and resell them in the form of the finished product. The juice accounts are used to keep an overview of the products at all times and to create orders and invoices for your customers. This can be tracked precisely. The function is available from the complete package.
activate juice accounts
To be able to create and use juice accounts, the function must first be activated via the settings. Activation takes place under System – Settings – Orders – Activate deposit items / juice accounts . To do this, check the box next to “Activate deposit items/juice accounts” and save this process. It is also possible to display the deposit items/juice accounts both in the order and in the checkout as an icon to access the functions even more quickly. Check the desired options here too and save the settings. Furthermore, please activate the settings "Output conversion with“ and ”Output accounts on PDF of the detailed statistics with". Please define another title for “Title for auto field output”, e.g. for display on documents (example: Overview of accounts).
Create juice account
To create a new juice account, first create a new article as usual (under “Article - New article”"). You can read how to create a en:New article here. Assign an article number and an article name corresponding to the juice account (example: apple). Under the “Packaging” item, you can select the following packaging type in the drop-down menu „piece“ or „Crate". Now save the article in the next step at the bottom, you will now be forwarded to the article file of the newly created juice account.
Determine article as juice account
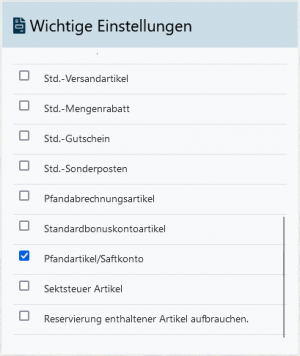
To specify that the newly created item is a juice account, set the following in the item „Other settings“ check the box next to "Deposit item/juice account“.
Artikeleinstellungen für die Annahme
Um Produkte, wie beispielsweise Äpfel für die weitere Verarbeitung zu Saft anzunehmen und im Programm verbuchen zu können, muss ein Artikel für die Annahme, passend zu dem Saftkonto, angelegt werden. Lege dafür wie zuvor einen neuen Artikel an (Beispiel Artikelname: Apfelannahme).
Hinweis: Hier ist es ganz wichtig, dass dieser Artikel, anders als zuvor, als Sortiment angelegt wird.
Dafür muss bei dem Punkt „Sonstiges“ angehakt werden, dass dieser Artikel als Sortiment zu behandeln ist. Speicher den Artikel für die Rücknahme ab.
Sortimentseinstellungen
Um bei der Annahme der Produkte Deiner Kunden und Kundinnen eine Bestandserhöhung um die exakte Menge der angenommenen Produkte zu erzeugen, muss das Sortiment mit dem ursprünglichen Saftkonto verknüpft werden. Dies kannst Du in der Artikelkartei des soeben angelegten Sortiments in dem Reiter „Artikel in diesem Sortiment“ festlegen. Füge dafür die Nummer des Saftkonto-Artikels (z.B. Apfel) ein und mit einem Klick auf den grünen Finger, weist Du diesen Artikel dem Sortiment für die Annahme zu. Trage anschließend bei der Anzahl eine "- 1" ein. Bei dem Anteil (%) trägst Du eine 100 ein und klickst anschließend auf anfügen.
Hinweis: Hier spielt das negative Vorzeichen eine besonders wichtige Rolle! Achte somit darauf, dass bei der Anzahl ein Minus vor die Zahl gesetzt wird. Mit dieser Einstellung wird beim Verkauf dieses Sortiments (bei der Annahme) der Bestand automatisch um eins erhöht.


