En:Customer-Card
| So findst Du diese Seite: |
| Symbol: |
You can access your customers information card using the customer information icon . This icon is displayed on the right side of each customer in the en:Customer List. In the customer information card, you can view and edit all relevant information about your customer, including address data, customer orders, purchased items, reservations, contacts, and more. The customer information card is also automatically displayed after creating new customers or after an en: New Customer . You can learn more about how the customer record looks and what information it contains on this page.
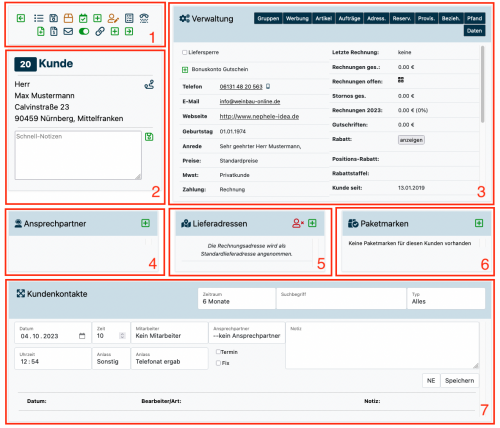
Structure of the Customer Information Card
- Icon Bar: Quick execution of various actions.
- Customer: Customer information and important notes.
- Management: Additional customer information and the ability to view orders, purchased items, and customer groups.
- Contact Persons: Overview of registered contacts, including phone numbers and email addresses.
- Delivery Addresses: Overview of stored delivery addresses.
- Parcel Labels: Overview of generated parcel labels and the option to create new parcel labels.
- Customer Contacts: Overview of documented customer interactions via phone, email, etc.
Icon Bar
The icons in the icon bar allow you to quickly perform various actions. Here’s what each icon does:
- Go to the previous customer card (active customer card with the next lower customer number).
- Navigate back to the parent customer list.
- Upload files to a customer file.
- Create a package label for this customer.
- Schedule a new appointment for this customer.
- Create a new task for this customer.
- Edit the customer file and update customer data.
- Select invoices for this customer.
- Start an online search for phone numbers related to the customer's name.
- Create a new order for the customer.
- Jump to the last order of the customer.
- View all invoices for this customer.
- Send an email to this customer.
- / Mark the customer as inactive or reactivate an inactive customer.
- Link this customer file and notes with another customer file: It often happens that a customer appears multiple times in the database. Before marking a customer as inactive, the conversation notes of that customer should be linked with the new or "main customer" to avoid losing old information.
- Add a new customer.
- Go to the next customer card (active customer card with the next higher customer number).
Customer
Customer Number
The number at the top left displays the customer number of the customer whose file you have opened.
Customer Information
Below the customer number, you can see the customer's information, such as name and address. By clicking on the map icon , you can view the customer's address on Google Maps.
Customer Note
Additionally, you have the option to view important agreements or notes about the customer under Quick Notes, or, if not already present, to add new notes that you would like to have as an overview when accessing the file. You can save your note by clicking on the save icon .
Management
Data
In addition to important customer data, such as contact information in the form of phone number, email address, and salutation, this tab displays further information like the registered standard payment method, standard discount information, the date of the last invoice, the total amount of invoices, any outstanding invoice amount, the amount of canceled items, the gross revenue of the current year compared to the previous year (period: January 1, 2023, to date - January 1, 2022, to XX.XX.2022), the amount of issued credit notes, how long the customer has been your customer, the payment term in days, the amount of the discount, and the number of reminders issued. Additionally, there is an option to upload and store an image (e.g., of the customer).
SEPA Mandate:
By clicking on the PDF icon, you can download a pre-filled direct debit authorization and SEPA mandate. The document is automatically filled with the customer and winery data stored in the system. This significantly simplifies the process of granting a direct debit authorization, as customers no longer need to manually fill in all relevant information. You can send the document by post or click on the envelope icon to quickly and easily send it to the customer via email.
Data Extract in accordance with GDPR:
By clicking on the PDF icon, you can create a customer-specific data extract in accordance with Articles 13 and 14 of the GDPR. For this, you can specify where the data originates (e.g., first order, personal contacts, etc.) and any other processing locations and transfers of data (e.g., tax advisors or agencies). If you do not want these optional pieces of information to be included, simply uncheck the corresponding box. Click the button "Generate Data Sheet" to output the document.
Groups
In this tab, you can assign customers to one or more customer groups. Simply check the relevant customer group. If you have created multiple categories for your customer groups, you can select a category here and display the customer groups corresponding to that category. Don’t forget to save this process afterward.
Advertising
In this tab, you can record and document your customer’s consent or refusal regarding various advertising channels. If consent has been given, check the box in the Allowed column. Additionally, you can indicate in the Documentation of Consent column how the consent was granted.
For example, if you create a newsletter or a circular, the box should be checked for the advertising channel Email. When selecting customers or in the email settings, you can specify that only customers who have given the appropriate consent will receive a newsletter.
Articles
In this tab, you will find a statistical overview of the items sold to this customer during a specific period. In addition to the number of sold items, the real price (net and gross) and the liter quantity will also be displayed. If you want to save this overview as an EXCEL or PDF file, you can download the corresponding tables by clicking on the EXCEL or PDF icon. You can adjust these and other settings for the relevant statistics by clicking the "Settings" button.
Orders
In this tab, you will find all orders related to the customer. The information is structured the same way as in the Order List.
Tip: For better comparison, detailed statistics, or export, click the customer statistics icon in the top right corner .
Address Articles
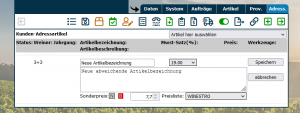
You will only see this tab if you purchase the Premium Package through us. If you want to give customers individual prices and/or designations for your items, the Address Article feature can help you. Here, you can first select which item should receive a different designation and/or price when sold to this customer. To do this, first choose the desired item from the dropdown menu. Then click on the pencil icon to edit the new entry. Enter any new item designation and description. If desired, you can also change the VAT for the item.
To set a new price, there are two options:
- Use the "Special Price" dropdown menu and enter the desired special price to the left. When selling the item to this customer, this price will be used. Since this is a special price, any active discounts, cash discounts, and commission locks may not apply.
- In the price list dropdown menu, select a price list. When selling the item to the customer, the price from the selected price list will be used. The discounts, cash discounts, and commission locks entered for the item in this price list will then apply as they would with a normal price.
Reservations
In this tab, all reservations available for the customer will be displayed. In addition to the item, you will also see the assigned warehouse, the total stock (the actual number of bottles available in the warehouse, summing free and reserved or blocked items), and the available stock (the current stock minus reservations and blocks). You also have the option to create a new reservation by clicking the symbol. By clicking the symbol, you can transfer all existing reservations into an order, or by clicking the symbol, you can access the reservation overview.
Commissions
In this tab, you can create new commission recipients, view already assigned commission recipients, and display all commission statements for this customer.
Attention: The commission recipients must also be set up as customers in the program.
If the customer you are currently viewing is also the commission recipient, you will find all commission statements for this customer here.
Note: Click here Klicke hier (YouTube-Video) if you want to learn more about working with commissions in the customer record.
Relationships
In this tab, you will see existing relationships with this customer. This allows you to map out relationships and affiliations between customers, such as recording constructs like "Is the mother of" or "Recommended by." You can also directly create a new customer relationship for this customer. To do this, select a customer you want to relate to each other, choose the type of relationship from the dropdown menu, and click "Create" to complete the process. When choosing the relationship, pay attention to the correct assignment of the "forward or reciprocal relationship."
Note: You must have previously created the type of relationship under "Customer - Relationship."
Deposits
Here, you can view and track all deposit accounts and corresponding transactions for the customer. This will always show you the most up-to-date customer-specific status of the deposit account.
Contacts
In the Contacts tab, you can create additional contacts. For example, this is useful for spouses or a larger company with multiple contacts. A new contact can be created by clicking on .
Here, you have the opportunity to enter not only personal and business data for the contact but also to select an appropriate salutation so that you can address the contacts correctly in emails or newsletters. If the contact is an invoicing recipient or a recipient of the newsletter, you can check this option accordingly.
If you have provided an email address for the contact, you can also send an email directly to this person by clicking the envelope icon next to the contact's name.
Delivery Addresses
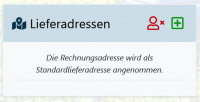
If you want to assign delivery addresses to the customer, click on the green plus sign under Delivery Addresses to create a new address. You can assign as many delivery addresses as needed. For new orders, the delivery address that has been marked as the default will be automatically selected.
Delivery addresses can be assigned manually or through the import function for delivery addresses. Delivery addresses can also be imported: All information on this can be found in the article Customer Data Import.
When creating a delivery address, the field "Delivery Note for Package Labels" can be filled out. If the specified delivery address is selected for the customer's package label, the note will appear on the package label to inform the driver. The same field is also available here when creating a customer or when editing customer data for the regular customer address.
Package Labels
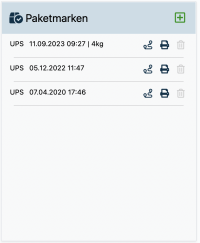
On this tab, you can view all package labels created for the customer and the status of each shipment , or print the package label . You also have the option to cancel package labels with a click on , if this is still possible. Additionally, you can create a new package label for the customer by clicking on .
Customer Contacts
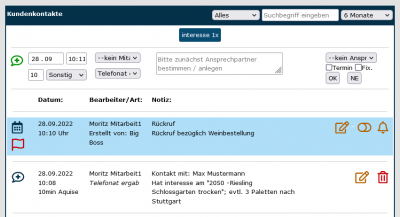
The Customer Contacts section allows you to accurately record and quickly search for customer-specific requirements. You manage customer contacts directly under the customer record and can view all communication with the customer at a glance. The Customer Contacts section is displayed in all tabs of the customer file so that you always have an overview and can implement discussed matters accordingly.
Here, various settings can be made before each note. It is advisable to maintain these settings so that the notes can be assigned as accurately as possible.
- In addition to the time and date, which are automatically filled in unless changed, there are many more settings that can be predefined.
- You can select the contact person so that you know who you actually spoke with.
- Employees can also specify their own names, allowing you and other potential employees to know who actually spoke with the customer.
- It can also be selected how the communication took place (email, phone call, etc.) and what it was about (e.g., acquisition).
Searching Customer Contacts
With the search field, notes can be searched and filtered by specific categories and time periods.
Tagging Customer Contacts
Through the conversation notes, you will find (if applicable) tags. For example, you can see if the word "Riesling" comes up frequently and quickly search for it. This helps maintain an overview of communication. The tags are entered as comma-separated values under System / Settings / Display (at the very bottom).
Sending Customers to Another Client
If you have booked an additional client and linked it with your account, the icon will appear in the toolbar. When you click on this, a new window will open where you can select the client to whom you want to send the customer. After sending, the customer will automatically appear in the client’s customer list. It is also possible to send customers from the client back to the main account.
Note: The customer number must not already be assigned in the recipient account. In this case, you will need to manually edit the customer number in the customer record.
