En:Letter
| So finden Sie diese Seite: |
| Briefe |
With Winestro.Cloud, you can easily create and send postal letters to your customers.
Previously Created Letters
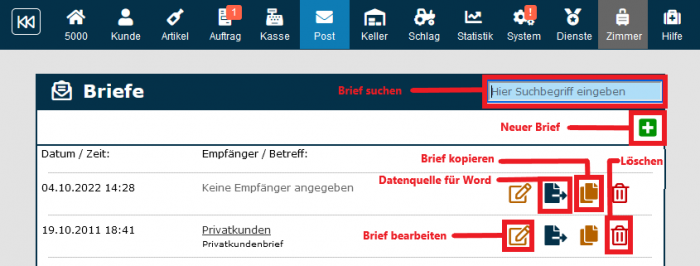
First, you will receive an overview of previously created letters. You can modify them at any time by clicking on the edit icon Image.png or choose different recipients. Alternatively, instead of creating letters with Winestro.Cloud, you can use this icon to load the recipients of the letter as a .csv data source for Word. An existing letter can also be copied by clicking on this icon [[Image .png]]. Deleting is, of course, also possible .
Creating a New Letter
To create a new letter, click on the button above the overview list.
You will then automatically be redirected to the new letter.
Step 1: Select Customers
In Step 1, you can choose the customers and customer groups you want to address with the letter. It may also be helpful to perform a Selection of your customer base beforehand. Additionally, you can set a subject. First, the subject serves as your own note, and second, you can have the subject printed on the letter in Step 3 (see below).
If you have added yourself or others as en:Employees in the system, you can also select who created the letter.
Step 2: Write Content
In Step 2, you can write the content of the letter. Winestro.Cloud offers two options for this. Whichever option you choose, always write only the specific content of the letter in Step 2. All other elements like customer greetings and addresses are set in Step 3.
Creating in Winestro.Cloud
You can write the content directly in Winestro.Cloud. To do this, click on the button on the right. With this option, you can write simple letters that contain few images or tables.
Creating in Microsoft Word
If you want more flexibility in design, click on "Write letter in Word." Then, open the downloaded Word letter template and write the content of the letter in Word. Afterward, save the completed letter as a PDF document. To do this, go to "Save As" in Word and select "PDF" as the file type. If you don't have Word 2007 or newer, we recommend installing the free PDF-Creator via the following link: http://de.pdf24.org/. Then, upload the completed PDF back into Winestro.Cloud.
Step 3: Make Settings and Print
Adjust Settings
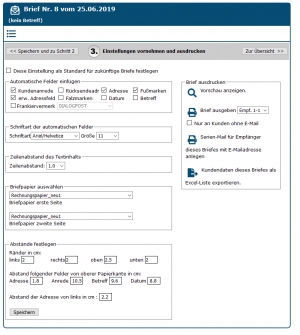
In Step 3, you set the options for this letter on the left side. Most options for automatic fields, such as the advanced address field, return address, and footers, are taken from the system settings (see Dokumente und Ausgaben festlegen). Customer-specific data, such as the customer greeting and address, are pulled from the respective customer file. You can also insert more automatic fields, like the date or folding marks.
The choice of fonts is limited due to the PDF creation program. However, you should find both serif and sans-serif fonts that fit nicely into your design. Additionally, you can adjust line spacing and set the margins for the document content.
You can also choose letterhead as a background for your letter, which you previously uploaded in the Briefpapier section.
If you have made any settings that you would like to keep for all future letters, enable the "Set these settings as default for future letters" checkbox at the top left.
Output and Print the Letter
On the right side of Step 3, you can print the entire letter.
At the top, you'll see this icon to preview the letter.
On this page, you will also find two printer icons ![]() :
:
1. The top printer generates a PDF document for all recipients specified in Step 1, optionally split into groups of 100 recipients each. This allows you to work more continuously and with shorter waiting times. Example: A PDF with 100 pages is generated faster than one with 2000 pages and can already be sent to the printer in the meantime. You can then create the next 100-page PDF, and so on.
There is an option, via a checkbox, to exclude all recipients from Step 1 who have an email address and consent to the newsletter marketing channel in their customer file when generating the PDF. If certain recipients are not excluded here, check the customer file for the email address and marketing consent.
2. The bottom printer icon does not create a letter but rather a new email with all recipients from the letter recipient list who have an email address and have consented to receiving the newsletter.
Hier ist die englische Übersetzung des letzten Teils:
Our recommendation for the combined use of these options is explained again in the example below.
Example: You create a new letter for a customer group that contains 500 customers. You want to save on postage by sending an email instead of a letter to customers who have an email address and have agreed to receive the newsletter. After creating the letter for all customers, you check the box for "Only to customers without email" and click the first printer icon. A document with 180 letters will be generated. So, of the 500 customers, 180 do not have an email address or have not agreed to receive the newsletter. Now, you want to send an email to the remaining 320 customers. To do this, press the second printer icon. The program will automatically create a new email with the 320 recipients.
Before using Winestro.Cloud's email features, it is recommended to thoroughly read the Email and Newsletter sections. Alternatively, you can contact us to book a newsletter training session.
Frequently Asked Questions
Font Looks Different
"I noticed that the formatting in a customer letter is inconsistent. The address field and greeting, which are automatically generated, look different from the text I inserted."
We use a program called LaTeX to set the automatic fields. It uses slightly different fonts than Word. Particularly in the PDF, this difference might look large, but it is mainly a display issue in the PDF. However, once you print the letter, you’ll see that the difference is hardly noticeable.
My Letter Looks Strange After Printing
"When I generate a letter as a PDF, the text appears distorted or in hieroglyphs."
Please refer to this entry: Dokumente sehen nach dem Druck unscharf bzw. undeutlich aus.
A Blank Page is Attached
"Unfortunately, after generating a letter, a second page is always displayed in the preview and printed, even though everything fits on one page. I’ve already reduced the font size, but the second page still appears and is printed."
Because the content of the letter just barely fits on one page, LaTeX — the program that generates the PDF documents — assumes a second page might be needed. Unfortunately, this cannot be prevented. However, what you can do (in addition to changing the font size) is reduce the page margins, which should remove the second page.
You Can Only See the Letter, Not the Letterhead!
You’ve probably uploaded your own PDF, and the background image will only work if the uploaded PDF has the appropriate transparency. You can think of it as printing the uploaded text on a transparent sheet that is then placed over a piece of paper. If the sheet is printed with white, you won’t see anything.
There are several ways to fix this:
- You can create a PDF with a transparent background (this is more advanced and difficult to explain here).
- If you still have the letterhead template in Word or another program, you can create the letter directly there, or insert the letterhead PDF into the Hintergrund.
- Use the letterhead as is and write the letter directly in the program.
Video Tutorial
We’ve created a video on this topic that explains letters in Winestro.Cloud in more detail.

